Free Web Hosting with Website Builder

Sunday, December 28, 2008

Ayumi Hamasaki - Days/Green (High Quality)

Release date: 2008.12.17
Quality: 128 kbps


Track List:
1. Days
2. GREEN
3. LOVE ~Destiny~ (10th Anniversary version)
4. Days (Instrumental)
5. GREEN (Instrumental)
6. LOVE ~Destiny~ (10th Anniversary version -Instrumental-)


download
here

Read More......

Thursday, November 13, 2008

YUI Album - My Short Stories [11.12.08] ~320 kbps~


My Short Stories [12.11.2008]


tracklist :

1. I'll be

2. HELP

3. Last Train

4. Winter Hot Music

5. Jam

6. Skyline

7. Free Bird

8. I wanna be...

9. Oh My God

10. Cloudy

11. Driving today

12. Understand

13. crossroad

14. It's happy line

15. Why me

INFO:
High Quality (CD Rip)


-> download<-
pass : hyz~kmc

Read More......

Tuesday, November 11, 2008

Mirror Update NOD32 v.3

last update : 11 Nov 2008

Click Here to download Nod32 antivirus update ver3 (10-11-2008)

Read More......

Monday, September 15, 2008

[TRICK] Download Movie from IMDB

If You Want to download movie from Imdb.com
so you can use nice trick in below


first, you must install Add-On 'grease monkey' Firefox from here

then install Javascript from here

FINISH...

preview :


Read More......

Saturday, July 19, 2008

Cannot Copy Files in Hardisk to Removable Drive

This trick can't do copying anything file in your Harddrive to Removable Drive


without use program, just modification in Registry File

step by step :


1. go to REGEDIT
2. Search String "HKEY_LOCALMACHINE\SYSTEM\CurrentControlSet\Control"

3. In folder CONTROL, type -> Edit>New>Key "StorageDevicePolicies"

4. in folder "StorageDevicePolicies", type Edit>New>Dword (32-bit)

5. rename Dword Value with : "WriteProtect"

6. Click 2x Key "WriteProtect", Replace Value Data with 1

7. Restart Windows


If Succes You will see prompt message


If you want to make default value

just type key "WriteProtect" with 0

Tested in Windows XP Service Pack 1, SP2, SP3, & Windows VISTA..

Read More......

Wednesday, July 9, 2008

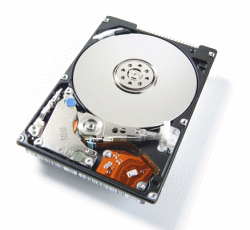
Install Windows XP on HDD SATA


SATA hard drives have become more and more appreciated tending to substitute the IDE drives due to the increasing speed they offer. Motherboard manufacturers started to implement the new standard years ago, when the technology was young and expensive. Now, as the SATA HDD prices have lowered to a level where anybody can afford to choose a SATA enabled HDD instead of an IDE one, a great migration has been observed among the common computer users.

SATA hard drives have become more and more appreciated tending to substitute the IDE drives due to the increasing speed they offer. Motherboard manufacturers started to implement the new standard years ago, when the technology was young and expensive. Now, as the SATA HDD prices have lowered to a level where anybody can afford to choose a SATA enabled HDD instead of an IDE one, a great migration has been observed among the common computer users.
They choose to install Windows and applications on SATA drives because they provide more speed which determines the system to run smoother. Thus, for those owning older mainboards with SATA support an extra step is required while attempting to install Windows XP. Windows XP does not provide drivers for all the SATA controllers, therefore, during the installation procedure, the user must insert a floppy with the drivers that came in the package along with the motherboard.

Not a big deal, not much effort, but the funny thing is that a great number of people passed on their floppy drives. Under these circumstances, no floppy means the impossibility to install Windows XP on SATA (on some mainboards). The result? The installation guide simply won't detect the SATA HDD.

People that were happy they got rid of the old removable drive have now motives to worry. Some may reconsider buying new floppy drives for their computers. Even if I wrote in a precedent article about the utility of the floppy drive, I do not encourage spending your money buying back an obsolete piece of hardware. I will present you a method to avoid this inconvenient by doing a software trick.

Let's take it slow. Where is the problem? We have a driver problem strictly because the SATA driver we need does not come embedded in the Windows XP installation package. What if we add the driver by ourselves before installing Windows?

What ingredients are involved
in this operation? The original Windows XP Installation CD, a freeware application named NLite and a blank CD. Moreover, we need the drivers for the SATA controller provided by the manufacturer. In case you did not find any floppy inside the motherboard package or you cannot locate them on the mainboard installation CD, you can consult the manufacturer's website to download the latest versions. To do the trick I have been talking about, it is assumed that you already have a Windows installed on an IDE drive. In case you don't, pay a visit to a friend and ask him to let you use his computer. It won't take too much time, I guarantee.

So, download the drivers and unzip them (in case they come archived) in a desired location. Then download and install the Nlite application. When you start the Nlite application, you will be asked to provide the location for the Windows installation package. Insert the genuine Windows Installation CD into the CD drive and, inside the application, select the CD drive letter.

To insert the SATA drivers within the installation package, you need to have it saved on the HDD. Hence, when the warning window appears click OK and select the destination folder for the files to be saved. Make sure that the destination partition / HDD has enough space to store the contents of the installation CD.

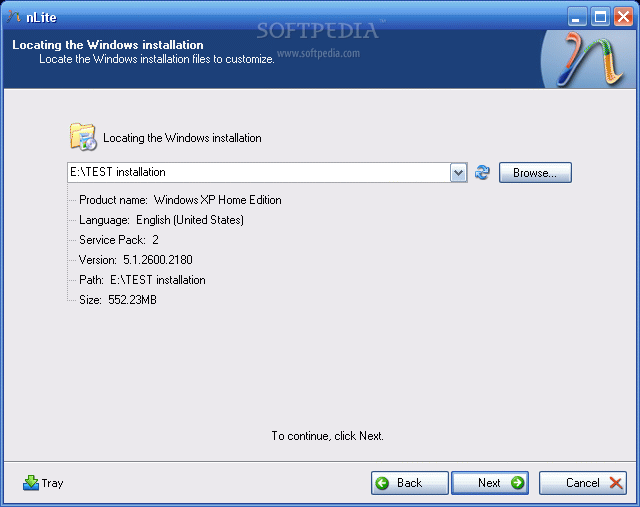
I tested a Windows XP Home Edition and it seems that it required about 566 MB. Immediately after you have chosen the destination folder, the application will start copying the Windows installation files. When finished, it will display some version information regarding the newly copied Windows Installation Package.

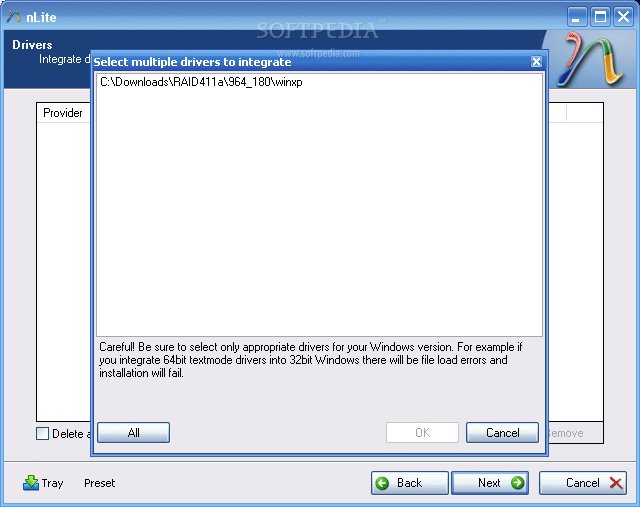
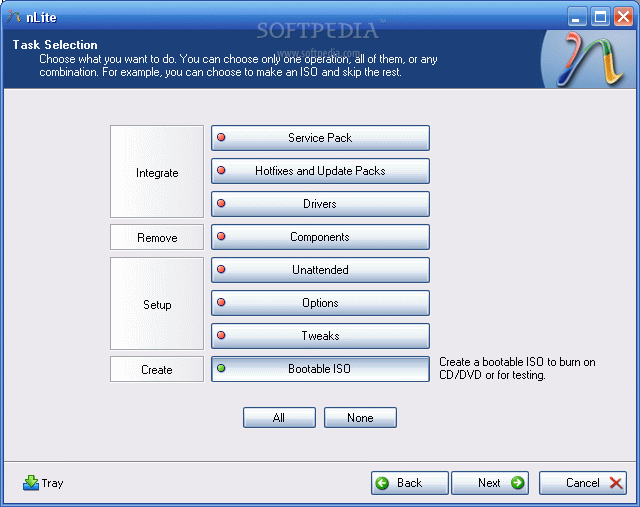
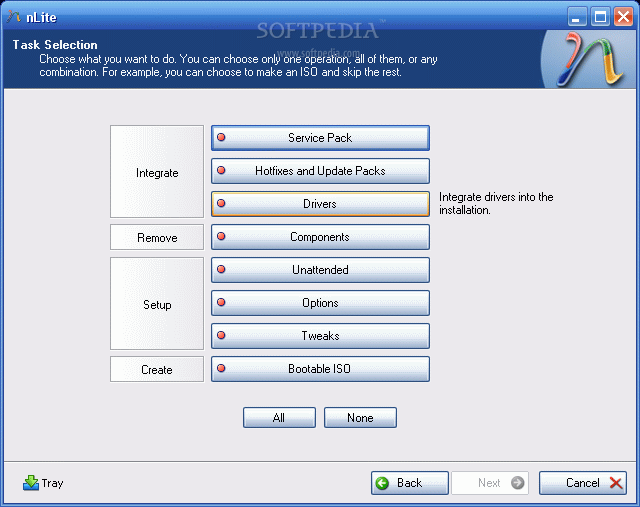
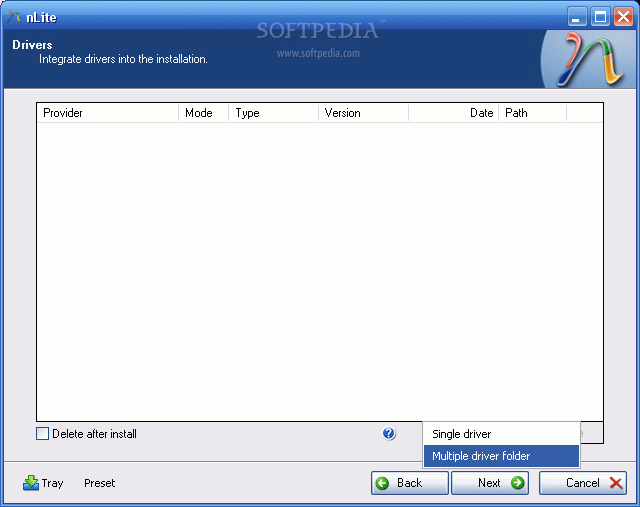
Now, click next twice until you get to a screen where you get options sorted in 4 categories: Integrate, Remove, Setup, Create. We are interested in the integration procedure, therefore select the Drivers button and click next. From the next menu window, click Import and select multiple drive folder option from the drop down menu. This option permits you to browse to the location where the downloaded drivers are found.

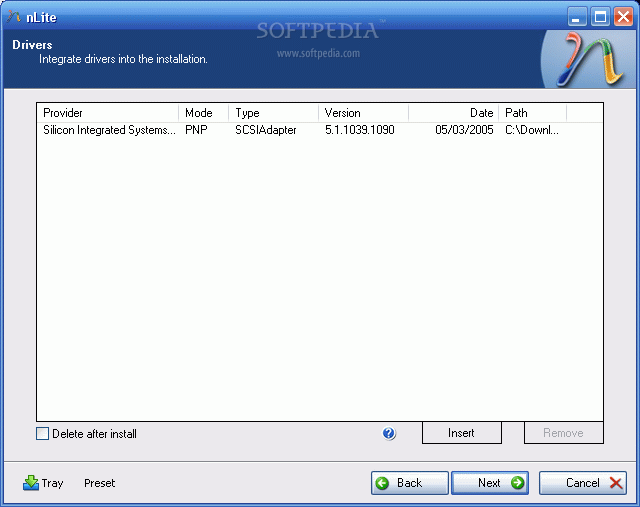
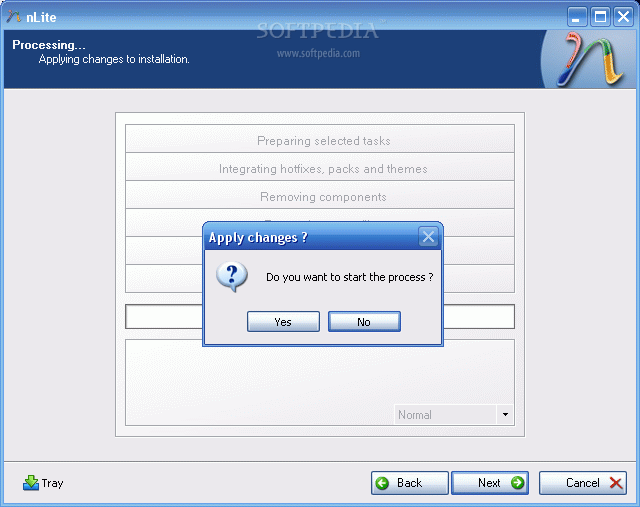
Select the containing directory and click next. You will get a list with the available drivers (in case there are more than one) or simply one driver. Select it (them) and click next. Now the application will ask for the permission to start the integration procedure. Choose Yes and wait for the drivers to be inserted into the installation package.


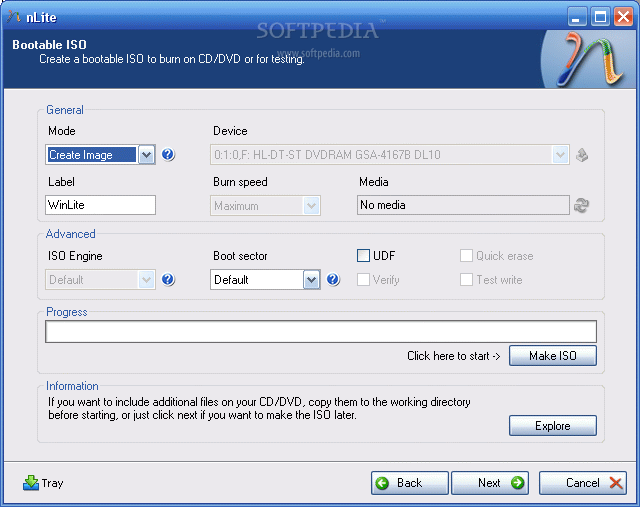
With problematic driver being included in the installation package you can install Windows XP on your SATA HDD...but...the installation package is on the HDD. You need a bootable CD in order to start an installation. Don't worry, once the installation package has been adorned with additional user selected drivers it can be transformed into a bootable disk image and later burned on a CD. To encapsulate the installation into a ISO image use the same Nlite application. Open it, make sure the HDD installation folder is selected and click next. Select "Last session" preset and click next again. Now from the options menu choose Bootable ISO and click next. In
the following window, make sure that the mode is set to "Create Image" and click Make ISO. A destination folder is required where the resulting ISO image will be saved. Once the image saving process finished you have the freedom to burn it on a blank CD with whatever you favorite CD burner software may be.


The new CD will be the twin copy of the Windows Installation CD but with

one difference, it includes the SATA driver.


Read More......

Thursday, July 3, 2008

YUI singles - SUMMER SONG [02.07.08] ~320 kbps~

[single] YUI - SUMMER SONG [02.07.08] ~320 kbps~


tracklist :
01.SUMMER SONG
02.Oh My God
03.Laugh away ~ YUI Acoustic Version ~
04.SUMMER SONG ~ lnstrumental ~

click here for download

INFO:
High Quality (CD Rip)
rename filename with .rar ekstension


Read More......

Thursday, June 19, 2008

YUI - SUMMER SONG (08.07.02) [VIDEO CLIP]

::YUI - Summer Song (New Release)::


Format : AVI(DIVX)
Resolution : 640x480

Screenshot:


Download via Netload.in: Download Now


Read More......

Sunday, June 15, 2008

TUTORIAL RIP DVD AND CONVERT TO AVI IN NO MORE 1 HOURS


INTRODUCTION

  • Pada waktu kita mau mengambil film pada DVD biasanya kita memakai cara kuno yaitu seluruh isi DVD kita copy semua ke dalam komputer kita atau menggunakan cara DVD source kita dicopy ke DVD blank, biasa disebut Copy Entire Disc.
  • Menggunakan kedua metode diatas sangat tidak dianjurkan sebab sangat menguras isi hardisk kita mengingat 1 DVD besarnya +- 4200-4400 MB ato cara copy entire disc yang sayang dengan DVD blank kita.
  • Sebelum kita memulai dengan tutorial ini saya ingin menambahkan bahwa cara yang saya gunakan saya jamin lebih cepat dibandingkan cara rip dengan software yang lain karena saya sudah membandingkan dengan semua software ripping yang pernah ada.


note: Ingat Spesifikasi komputer sangat berpengaruh dalam melakukan metode ripping di tutorial ini dalam hal kecepatan proses ripping

Spesifikasi komputer yang digunakan dalam melakukan tutorial ini adalah :

  • Processor: Intel Pentium Celeron 1.7 Ghz Cache 128 KB
  • Memory : 256 MB
  • Hardisk : 160 GB 7200 RPM ATA Buffer 2 MB
  • OS : Microsoft Windows XP Professional Service Pack 1

Film yang digunakan dalam tutorial ini :

- Wrong Turn 2 : DEAD END


Informasi File

- Total Play Time (Main Movie) : 01:36:49


Software yg dibutuhkan :
  1. Nero Recode 2 (bundel dari Nero Digital).

    Screenshot Nero Recode

  2. WinAVI 9.0

    Screenshot WinAVI


Ada dua cara yang bisa kita gunakan dalam melakukan proses ripping dalam tutorial ini :


1. Melakukan proses ripping dengan hasil output subtitle keluar (language subtitle tidak bisa dipilih hanya bisa default, biasanya English, atau bisa dipilih language tetapi diedit dulu dengan Nero Recode 2).

2. Melakukan proses ripping dengan hasil output subtitle tidak keluar (menggunakan Nero Recode 2, language subtitle bisa ditampilkan atau tidak).


Note: di Nero Recode 2 memilih menu Remake a DVD jika sudah selesai di remake maka di convert menggunakan program WinAVI.


Cara Pertama dengan melakukan proses ripping dengan hasil output subtitle keluar

1. Buka program WinAVI.


2. Pilih menu Convert your media to AVI format.


3. Select Open as DVD.

Note : browse langsung dari kepingan DVD.


4. Sehingga terlihat tampilan menu seperti ini.

Tampilan menu sebelum convert


5. Pada menu Conversion Mode pilih Main Movie.


6. Pilih lokasi yang diingini pada Output Directory.


7. Klik Advanced untuk settingan resolusi, framerate, audio dan video codec.


Tampilan menu Advanced Options


8. Untuk Codec Video dan Audio biarkan memakai default codec nya WinAVI.


9. Frame Rate sesuaikan dengan frame rate source,check keep original frame rate.


10. Untuk Picture Size, resolusi video saya memakai settingan umum yaitu 640x480.


11. Untuk Audio, check Enable DirectAC3.


Note : sekedar diketahui bahwa DVD memakai format DirectAC3.

12. Klik OK untuk melakukan proses ripping.


Tampilan proses ripping WinAVI


13. Ingat kondisi Time Left bisa lebih cepat atau lebih lambat dalam melakukan ripping tergantung dari spesifikasi komputer saudara.


14. File info mengenai movie yang sedang di ripping saat ini bisa dilihat di sini.


15. Sedangkan spesifikasi komputer yang sedang digunakan saat ini juga bisa dilihat di sini.


16. Saya juga menjamin quality setelah diripping 99,9 %* lebih bagus dibandingkan software ripping yang lain untuk saat ini

* = bisa lebih jelek karena ada program baru atau sudah ter-update versi program WinAVI 9.0 dalam beberapa tahun ke depan.


Cara Kedua dengan melakukan proses ripping dengan hasil output subtitle tidak keluar


1. Buka program Nero Recode 2.


2. Select Remake a DVD.


3. Pilih Import Titles.


4. Pilih Main Movie.


5. Klik Add Title.


Tampilan Remake DVD Nero Recode 2


Tampilan Subtitle beserta urutan


6. Disinilah asyiknya Nero Recode 2 kita bisa memodifikasi isi dari DVD misalnya kita tidak senang bahasa Chinese atau Thai kita bisa menghilangkannya dan hanya memilih bahasa English dengan Malay sehingga nanti bisa di burn lagi ke DVD.


7. Kembali ke tutorial, bahwa inilah yang menyebabkan jika langsung meripping dengan WinAVI 9.0 kita langsung mendapati bahwa subtitle yang keluar pasti langsung English, ini karena Subtitle English terletak pada indeks pertama. Coba saja jalankan program pemutar DVD maka jika kita ingin mengeluarkan bahasa, subtitle English terletak pada urutan pertama bandingkan dengan subtitle Malay yang terletak di urutan ketiga.


8. Pada kali ini saya tidak memilih bahasa yang akan dikeluarkan.


9. Dengan ini asumsi saya hasil movie setelah di remake tidak keluar menu subtitle.


10. Maupun setelah diconvert ke AVI dengan WinAVI 9.0.


11. Maka jika kita ingin memunculkan subtitle kita pada movie setelah diconvert menjadi AVI maka saudara bisa melihat tutorial saya yang sebelumnya

Tutorial RIP Subtitle dari DVD by yudhistira / Ripping Subtitle from DVD by yudhistira


12. Klik Next.


13. Settingan di page ini biarkan default saja.


14. Kemudian Klik Burn.


15. Proses Recompiling ato Recoding sedang berjalan.


Proses recompiling


16. Time Remaining tidak linear pada gambar Proses recompiling, dalam tutorial ini selesai dalam waktu +- 15 menit.


17. Kemudian cara convert dari file DVD yg telah di remake dengan NeroRecode 2 menjadi format AVI caranya sama dengan cara ripping dengan WinAVI yang terletak pada Click Here


18. Bedanya file VOB yang dibrowse bukan dari kepingan DVD lagi melainkan dari direktori pada hardisk kita.


19. Proses convert ke format AVI selesai dalam waktu +- 40 menit.


Attention : sekali lagi lamanya waktu proses ripping diatas sangat bergantung pada spesifikasi komputer, waktu total main movie DVD tersebut, settingan konfigurasi baik codec, resolusi dan
lain lain
.


- SELESAI File Movie Siap untuk dinikmati
-----------------------------------------------------------------------------------------
download :
Nero Digital
pass : www.ultimate-caffe.org

WinAvi 9

Read More......

Tutorial RIP Subtitle dari DVD by yudhistira / Ripping Subtitle from DVD by yudhistira

INTRODUCTION

Setiap kali kita mau ambil subtitle dari DVD kita tidak tahu cara mengekstraknya atau sudah dicoba tapi tidak berhasil karena program yg kita coba sebelumnya seperti IMTOO DVD Subtitle Ripper ato dll tidak menggunakan metode OCR (optical Character Recognision) dalam pengekstrakan subpicture pada DVD. /
Each time we will take subtitle from DVD not know way to exracted or has been tried but fail because program we try previous like IMTOO DVD Subtitle Ripper or etc using no method OCR (optical Character Recognision) in extracted subpicture at DVD


Tool Yang Perlu Disiapkan... / Program required


  1. subrip v.1.50

    nice little tool that allows us to convert imagemap-only subtitles that are on DVD discs into pure text format,

    which will take only couple of kilobytes of space after completed


    screenshot

  2. SubtitleWorkshop v.251

    Subtitle editor, converter and synchronization

    screenshot
-----------------PROGRAM CAN BE DOWNLOAD AT THE END TOPIC----------------------


Langkah Pertama / The first step
- Buka program Subrip / Open Subrip Program
- Go To File - Open VOB(s)
- Select Open IFO
- Browse File IFO kamu / Browse Your's File IFO
- Select VOB yg mau diambil subnya / Select VOB that will be taken


- Pilih Output Format,pilih defaultnya saja defaultnya .srt
/
Choose Output Format, choose default *.srt

- Browse Character file kamu
/
Browse Your File Character

note:
catatan jika belum pernah save char matrix file sebelumnya defaultnya NEW FILE
/ if you will not yet save char matrix file previously, default is
NEW FILE

note 2:
ini sangat menentukan dalam pengenalan karakter untuk itu biasakan membuat char matrix file km sendiri2 sesuai judul filmnya,karena tiap film berbeda-beda jenis font,color,ataupun sizenya
/ this very determine in character recognition for that accustom make char matrix your file according to its film title, because every film different each other type font, color, or size


- Go To Start utk memulai ripping /
Go To Start to begin ripping


note 3 :
jika character sudah sesuai sama file char matrix yang sebelumnya sudah disave maka kita tidak perlu memasukkan kata satu persatu lagi
/if character has been according to same file previous char matrix already save then we needn't enter word one by one next


untuk memastikkan character apa aja di file matrix kamu
/
to ascertain what character just in file matrix


- Jika ditengah proses rip mendapati pop-up seperti ini
/
Is in the middle of processed rip discovers pop-up like this


ketikkan character yg sesuai dengan yang diminta
/
type character matching with asked


- Ketika selesai Go to file-Save As-Lalu tekan Save sperti ini
/
When finished Go to file-Save As-then press button Save like this


- dan jadilah file subtitle yg berformat .srt
/
and there will be file subtitle that have format .srt


Langkah Kedua / Second Step
- Jika terdapat file .srt yg tidak synchronize waktu dimainkan dengan file videonya tidak perlu kecewa mengedit satu demi satu per baris
/
If existed file .srt that not synchronize time is played with its video file needn't disappointed edit one by one line

- Buka Subtitle Workshop
/
Open Subtilte Workshop Program

- Lihat kondisi waktu kamu membuka file .srt kamu
/
See your time condition opens file .srt

- Jika INPUT FPS tidak sesuai dengan FPS Output maka sesuaikan
/
If INPUT FPS dismatch with FPS Output then equalize

- jika tetap tidak synchronize lihat pada waktu kamu memainkan video apa subtitle terlalu cepat keluar atau terlalu lambat
/
if remain not to synchronize saw when you played subtitle what video untimely exited or too tardy


note:
aku asumsikan terlalu lambat maka kita edit delay nya
Go to Edit-Timings-Set Delay
Pilih for all the subtitles
/
I assumed too tardy then we edit delay time
Go to Edit-Timings-Set Delay
Select for all the subtitles


- SAVE ,selesai
/
SAVE, finish


  • Download Program AIO Rip Subtitle DVD

http://adf.ly/GiDXz

Read More......

YUI - SUMMER SONG (08.07.02) [192kbps-PVrip]

YUI - SUMMER SONG (08.07.02) [192kbps-PVrip]


1-1SUMMER SONG - この曲だけ
1-2Oh My God
1-3Laugh Away-YUI Acoustic-
1-4Summer Song-Instrumental-

DOWNLOAD
PASS=YUI@KMC

Read More......

Wednesday, June 11, 2008

Tutorial Synchronize 2 PC on a Network

Networking, as we all know, is the linking of two or more computers so that resources such as the printer and
the Internet connection can be utilised by more than one user at a time. In order to connect the computers,
hardware such as router and server may be required. However, if your intention is to connect only two
computers,there are two extremely cost-saving ways to do so, as described below.


(Instructions on how to
share the printer and the Internet connection are given at the end of this blog entry)


The wired way involves utilising the RJ-45 port on
the two desired computers. Also known as a LAN port, it looks similar to the phone jack (RJ-11 port) on your
modem. You would need to obtain a crossover LAN cable (not conventional LAN cable) and plug the ends
into each of the two computers. The subsequent lines explain how the networking is done (assuming the
computers are running Windows 98 and above):

For the sake of simplicity, the two computers will be called DAD and MOM respectively.


    ON "DAD"
  1. Right-click "My Computer", click "Properties"

  2. Click "Computer Name" Tab

  3. Click "Change"

  4. A window should pop-up. Specify a name for the computer.


  5. Click "Workgroup" and specify a name. (We will call the computer DAD and the workgroup HOME)

  6. Click OK

  7. Click OK in the computer properties windows. Restart the computer if prompted.


    Configuring IP

  1. Go to Start > Control Panel > Network Connections > Network Connections

  2. Right-click on your LAN connection and click "Properties"

  3. Under the heading "This connection uses the following items", click "Internet Protocol (TCP/IP)

  4. Click "Properties"

  5. A new window should pop up, click "Alternate Configuration"

  6. Click "User configured" radio button


  7. Here, you can specify the address. For computer DAD
    , specify the IP as 192.168.0.2, subnet mask as
    255.255.255.0, Default gateway as 192.168.0.1. Under Preferred / Alternate DNS server, the values for Xtra
    are 202.27.158.40 and 202.27.156.72 respectively (the address may vary between ISPs). If you are unable
    to determine your ISP's Preferred / Alternate DNS server addresses, just surf on to OpenDNS for options available.

  8. Click "OK"

  9. Click "OK" under the LAN connection properties.

  10. You are done for computer DAD


    ON "MOM"
  1. Right-click "My Computer", click "Properties"

  2. Click "Computer Name" Tab

  3. Click "Change"


  4. A window should pop-up. Specify a name for the computer.

  5. Click "Workgroup" and specify a name. (We will call the computer MOM and the workgroup HOME)

  6. Click OK

  7. Click OK in the computer properties windows.

  8. (You may have to restart the computer. If you are prompted to, do so)


    Configuring IP
  1. Go to Start > Control Panel > Network Connections > Network Connections

  2. Right-click on your LAN connection and click "Properties"

  3. Under the heading "This connection uses the following items", click "Internet Protocol (TCP/IP)

  4. Click "Properties"


  5. A new window should pop up, click "Alternate Configuration"

  6. Click "User configured" radio button

  7. Here, you can specify the address. For computer MOM
    , specify the IP as 192.168.0.1, subnet mask as
    255.255.255.0, Default gateway as 192.168.0.2. Under Preferred / Alternate DNS server, the values for Xtra
    are 202.27.158.40 and 202.27.156.72 respectively (the address may vary between ISPs). If you are unable
    unable
    to determine your ISP's Preferred / Alternate DNS server addresses, just surf on to OpenDNS for options available.

  8. Click "OK"


  9. Click "OK" under the LAN connection properties.

  10. You are done for computer MOM

When the steps above are done correctly, the computers will automatically discover and connect to each other.


Sharing the Internet Connection (URL to
this section
)


Assuming the Internet is connected via broadband (ADSL) connection on DAD

  1. Go to Start > Control Panel > Network Connections > Network Connections

  2. Left-click on wireless adaptor once

  3. Hold down the Ctrl key and left-click on broadband connection once

  4. Right-click on either of the connections, and click "Bridge
    Connections
    "


  5. When correctly done, both the wireless adaptor and broadband connection icons should appear under a new
    heading called "Network Bridge"


Assuming the Internet is connected via dial-up connection on
DAD


  1. Right-click on your dial-up connection, click "Properties".

  2. In the new window, click "Advanced" and place a tick for "Allow other network users to connect through
    this computer's Internet connection".


  3. Click "OK" to save

  4. Important Step: Check your IP configuration


    1. Go to Start > Control Panel > Network Connections > Network Connections

    2. Right-click on your wireless adaptor and click "Properties"


    3. Under the heading "This connection uses the following items", click "Internet Protocol
      (TCP/IP)

    4. Click "Properties"

    5. A new window should pop up, click the radio button "
      Obtain an IP address automatically
      "

    6. Click "OK" to save


  5. You are done!


Sharing the Printer (URL to
this section
)


Assuming the printer is connected to DAD

  1. Go to Start > Printers and Faxes

  2. Right-click on the desired printer, click "Sharing..."

  3. Click the radio button "Share this printer" and specify
    a name in the textbox


  4. Click "OK" to save


Read More......