::YUI - Summer Song (New Release)::

Format : AVI(DIVX)
Resolution : 640x480
Resolution : 640x480
Screenshot:

Read More......


INTRODUCTION
 Informasi File
- Nero Recode 2 (bundel dari Nero Digital).
Screenshot Nero Recode - WinAVI 9.0
Screenshot WinAVI
 Tampilan menu sebelum convert
 Tampilan proses ripping WinAVI
 Tampilan Subtitle beserta urutan
INTRODUCTION
Setiap kali kita mau ambil subtitle dari DVD kita tidak tahu cara mengekstraknya atau sudah dicoba tapi tidak berhasil karena program yg kita coba sebelumnya seperti IMTOO DVD Subtitle Ripper ato dll tidak menggunakan metode OCR (optical Character Recognision) dalam pengekstrakan subpicture pada DVD. / Each time we will take subtitle from DVD not know way to exracted or has been tried but fail because program we try previous like IMTOO DVD Subtitle Ripper or etc using no method OCR (optical Character Recognision) in extracted subpicture at DVD
-----------------PROGRAM CAN BE DOWNLOAD AT THE END TOPIC----------------------
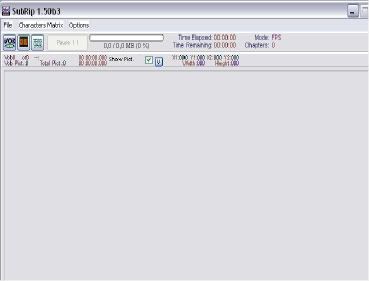
- subrip v.1.50
nice little tool that allows us to convert imagemap-only subtitles that are on DVD discs into pure text format,
which will take only couple of kilobytes of space after completed
screenshot
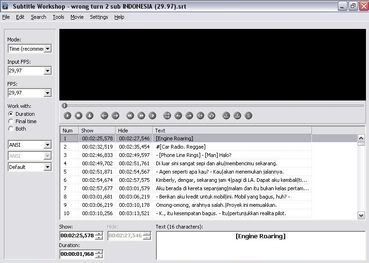
- SubtitleWorkshop v.251
Subtitle editor, converter and synchronization
screenshot
Langkah Pertama / The first step
- Buka program Subrip / Open Subrip Program
- Go To File - Open VOB(s)
- Select Open IFO
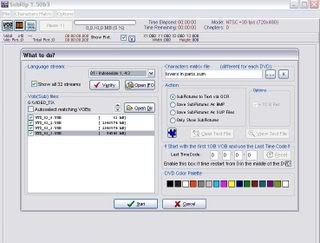
- Browse File IFO kamu / Browse Your's File IFO
- Select VOB yg mau diambil subnya / Select VOB that will be taken
- Pilih Output Format,pilih defaultnya saja defaultnya .srt
/ Choose Output Format, choose default *.srt
- Browse Character file kamu
/ Browse Your File Character
note:
catatan jika belum pernah save char matrix file sebelumnya defaultnya NEW FILE
/ if you will not yet save char matrix file previously, default is NEW FILE
note 2:
ini sangat menentukan dalam pengenalan karakter untuk itu biasakan membuat char matrix file km sendiri2 sesuai judul filmnya,karena tiap film berbeda-beda jenis font,color,ataupun sizenya
/ this very determine in character recognition for that accustom make char matrix your file according to its film title, because every film different each other type font, color, or size
- Go To Start utk memulai ripping / Go To Start to begin ripping
note 3 :
jika character sudah sesuai sama file char matrix yang sebelumnya sudah disave maka kita tidak perlu memasukkan kata satu persatu lagi
/if character has been according to same file previous char matrix already save then we needn't enter word one by one next
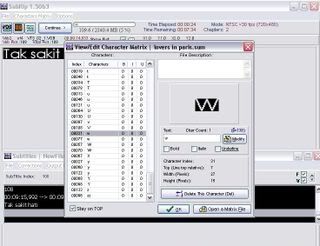
untuk memastikkan character apa aja di file matrix kamu
/to ascertain what character just in file matrix
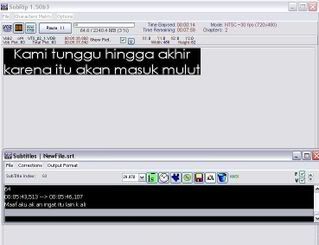
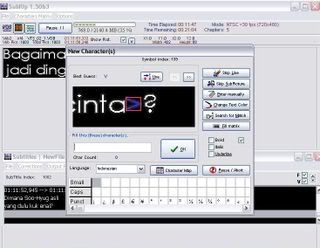
- Jika ditengah proses rip mendapati pop-up seperti ini
/Is in the middle of processed rip discovers pop-up like this
ketikkan character yg sesuai dengan yang diminta
/ type character matching with asked
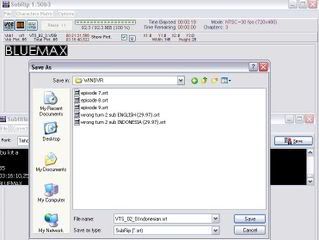
- Ketika selesai Go to file-Save As-Lalu tekan Save sperti ini
/When finished Go to file-Save As-then press button Save like this
- dan jadilah file subtitle yg berformat .srt
/ and there will be file subtitle that have format .srt
Langkah Kedua / Second Step
- Jika terdapat file .srt yg tidak synchronize waktu dimainkan dengan file videonya tidak perlu kecewa mengedit satu demi satu per baris
/If existed file .srt that not synchronize time is played with its video file needn't disappointed edit one by one line
- Buka Subtitle Workshop
/ Open Subtilte Workshop Program
- Lihat kondisi waktu kamu membuka file .srt kamu
/See your time condition opens file .srt
- Jika INPUT FPS tidak sesuai dengan FPS Output maka sesuaikan
/If INPUT FPS dismatch with FPS Output then equalize
- jika tetap tidak synchronize lihat pada waktu kamu memainkan video apa subtitle terlalu cepat keluar atau terlalu lambat
/ if remain not to synchronize saw when you played subtitle what video untimely exited or too tardy
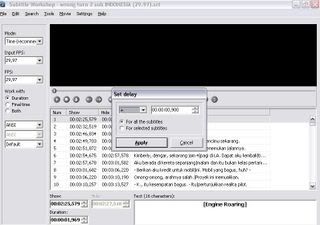
note:
aku asumsikan terlalu lambat maka kita edit delay nya
Go to Edit-Timings-Set Delay
Pilih for all the subtitles
/I assumed too tardy then we edit delay time
Go to Edit-Timings-Set Delay
Select for all the subtitles
- SAVE ,selesai
/SAVE, finish
- Download Program AIO Rip Subtitle DVD
http://adf.ly/GiDXz
Networking, as we all know, is the linking of two or more computers so that resources such as the printer and
the Internet connection can be utilised by more than one user at a time. In order to connect the computers,
hardware such as router and server may be required. However, if your intention is to connect only two
computers,there are two extremely cost-saving ways to do so, as described below.
The wired way involves utilising the RJ-45 port on
the two desired computers. Also known as a LAN port, it looks similar to the phone jack (RJ-11 port) on your
modem. You would need to obtain a crossover LAN cable (not conventional LAN cable) and plug the ends
into each of the two computers. The subsequent lines explain how the networking is done (assuming the
computers are running Windows 98 and above):
For the sake of simplicity, the two computers will be called DAD and MOM respectively.
When the steps above are done correctly, the computers will automatically discover and connect to each other.